Jul 25, 2007

Camera Raw 4.0

Is a plugin for Adobe Photoshop CS3 / Bridge CS3
This is by no way a 'new' plugin in any sense. It has been available since the first version of the CS package came out. Many photographers have had their workflow improved greatly by this lite application.
Decided to focus a little on the direct improvements from previous versions, and why I think it's worth the download.
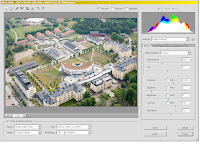
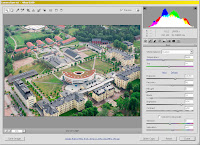
(top: Camera Raw 3.5, bottom: Camera Raw 4.0)

The addition of two tools in the toolbar

  • Retouch - This tool allows indirect healing-tool or clone-tool actions via the xmp-sidecar files, the retouches aren't final and can be stacked/destacked at any time. Very nifty.
  • Red eye removal - Remove the red eyes from pictures where the built in flash fired. This is also an indirect edit, can be reset at any time.

Also the initial adjustment page has gotten some new options that are notable:

  • Recovery - Compresses the luminance in the image, making high separations in luminance such as sky/ground differences less notable.
  • Fill light - Jacks up the shadows/midtones in the image, sort of compressing from the bottom.
  • Vibrance - Adds more saturation to midtones and less on areas with high contrast to keep the saturation from bleeding out.

The tone curve (2nd dialog) now has the addition of a parametric curve for control-freaks.
Theres also the addition of two brand new dialogs:

HSL/Grayscale
Is an powerful control for separate color adjustments. This practically replaces everything you did with the HSL-dialog in Photoshop before but with 16-bit color control. Everything simply looks better and is reversable in a second.

Split Toning
Another brand new dialog, with this you can apply the equivalent of a gradient map-adjustment layer in Photoshop, with more control of course. Individual control over the application of shadow/highlight toning and a balance slider.

In addition to all this good stuff theres more options in the Camera profile dialog, theres also a preset dialog that allows you to easily manage all your preset color corrections.

If you're not convinced after all this, well... there's nothing I can do really.

Methanol powered laptops

Ever run out of batteries on your laptop and have it go to hibernation in the middle of some important task, pull your hair and shout obscenities at your friends? Apparently those days are soon over.
Read through the usual tech-news this morning and found out that Toshiba is developing a fuel cell for laptops as an alternative to Lithium-Ion based batteries.

Tokyo--Toshiba Corporation today announced the world’s first prototype of a small form factor direct methanol fuel cell (DMFC) for portable PCs, a clean energy breakthrough with the potential to end reliance on rechargeable batteries. The new fuel cell currently realizes average output of 12W and maximum output of 20W, and can achieve approximately five hours of operation with a single cartridge of fuel. It provides instant power supply, and achieves significant advances in operating times with replaceable methanol cartridges.
Read more about the fuel cell at Thoshiba

Jul 11, 2007

Converting 2D images to 3D

As I was working today i came across a really nifty tool for doing automatic 3D-mapping of standard images.

The project is found here
http://www.cs.cmu.edu/~dhoiem/projects/popup/

As i started playing around i found that a whole lot of more tools are needed to create the models, then i came across this blog, by a guy that did the whole thing about a year ago.
Apparently he was using Linux, because one of the tools wasn't available as a win32 executable.
http://blog.duk0r.net/2006/09/30/
how-to-transform-2d-images-to-3d/


(After step 3 your image should look like the right one)

Heres the whole thing again, but in win32 only:

Software

ImageMagick (Convert input image to .pnm) [Binary]
Image Segmentation [Source] [Binary] (This binary is compiled by me, and i give no support whatsoever)
Automatic Photo Pop-up [Binary][Documentation]
MATLAB 7.x libraries (100 MB) [Binary] (If MATLAB isn't installed on your computer, you must install the runtime libraries)

How-to


  • Make sure to install everything correctly, ImageMagick and the other tools are best added to path so you can access them directly from the command prompt, because you'll spend the time there from here on.
  • use ImageMagick
    example command: convert image.jpg image.pnm
  • then use Image Segmentation
    usage: ./segment sigma k min input(ppm) output(ppm)

    example command: segment 0.8 100 100 image.pnm image.pnm
  • after that, use Photo Pop-up
    usage: photoPopup [fnData] [fnImage] [extSuperpixelImage] [outdir]
    fnData: filename for .mat file containing classifier data
    fnImage: filename for original RGB image
    extSuperpixelImage: filename extension for superpixel image
    outdir: directory to output results

    (make sure you have your images in the right directories)
    example command: photoPopup ./classifiers_08_22_2005 ./image.jpg pnm ./output
    (this step took 5-10 minutes)
  • Find a fitting wrl-viewer/converter to view/convert the results.
Footnote

Read all the documentation thouroughly, if you like science find out more about how the image segmentation works here. Or more about Geometrically Coherent Image Interpretation here.

Sachsenhausen

(click the title for a gallery)

Got back from Germany about two weeks ago, the trip was a bit funnier this time as it didn't require my family to deal with the practical aspects of my grandfather passing away. Since the trip was basically the same, the photo opportunities where less.

During our visits we came across one historical landmark that was quite unique for germany. The Sachsenhausen concentration camp mainly operated 1936-1950 (the last 5 years under russian control).

Since wikipedia already has an article about it I won't hassle with the details. More reading here: http://en.wikipedia.org/wiki/Sachsenhausen_concentration_camp/